Intro to Version Control with Git on Command Line/ Terminal
The Basic Skill of using git is a necessity when it comes to Software Development. Here we will talk about how one can get started with git on terminal.

I took up a course on Git recently and thought of sharing what all I learned. No, I’m not promoting any course. It is always said that if you can teach it to others, then you’ve mastered the concept. So here I go telling you every bit of Git. I will divide the concepts into multiple articles so that it doesn’t seem too intimidating to the newbies. If you haven’t worked in terminal/command prompt before, I might also help you learn that.
Note : If you already know little about Git and want to work right away then jump to Step 1.
I always wanted to learn Git but never understood it entirely because I read concepts from multiple articles and never implemented them in reality. And even if I did, I opened Git once in five months, maybe. I have a request to you that if you don’t know much about Git/ GitHub, then do not simply read this article, implement it simultaneously; otherwise, after few months, you won’t even remember what you read. Well, that would be sad. So warm up yourself and open up your PC💻 and let’s learn this together🙌 :D
Why Git?
You would have worked in group projects which required you to work on some code. We can manage if there are maybe three people in the group. What if there are 5, 10, 30 members? How would you collaborate? It will be so chaotic. One person changes a piece of code then shares it to all the members, and by then, if the other person has made the changes, it will be damn confusing! No one can work like that! You might think there won’t be so much confusion if we are working in the same place. Think of this time of the Covid-19 outbreak. We have heard the news that so many software companies have transformed into a work-from-home working type. How do they work together? There are people from different places/nations working on the same project, and there are thousands of employees working. We often make changes in the project by mistake, or we don’t like what change we made, but we have no way to revert. And what if our system crashed forever, then what about the files we saved on PC? That is a huge problem! The solution to this is Git!
What is Git?
A platform that keeps track of every change we make in the file so that we can jump to the previous version of our documents whenever we want is called version control systems (VCS). Git is a tool that helps multiple users collaborate with their work. Users can make changes to the work in their local PC and later upload it to Git’s main project file (remote repository), which is saved on the cloud; hence we can never lose information as every change is saved! Git is hence a DVCS, i.e., a Distributed Version Control System. Each user has a local project history and can work independently offline on the project, later synchronise it with the remote repository.
What’s GitHub then?
If you store the files in online mode, i.e., if you use the internet for saving, modifying, cloning, merging, deleting, sharing your files saved on a server, then that’s Github. It’s that simple! Git with the internet is GitHub. There is another popular VCS, BitBucket. You can use either of the two. But in this, I’ll use GitHub. Even if you didn’t understand what I just said or if you’ve numerous questions regarding its working, then keep calm! We will know them all step by step.
Let’s begin the Git journey finally!✨
Disclaimer: I would keep exchanging the terms folder/ files/ repository/ directory and command line/command prompt/ terminal/ cmd. In the gray code blocks, everything written after // is a comment. And the one in bold in is the command that you need to type.
Step 1: Installing Git on PC
You can check if you have Git installed already by opening your command prompt.
Type cmd on search bar, a black window opens. Welcome to command prompt! Somehow working on this black window always gives me a feeling of an awesome developer :P
Type
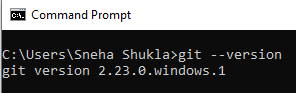
git --version
and press enter.
If it shows git version and some number it means you have Git already installed. Eg:
If it says git is not an internal/ external command then you don’t have Git installed. Let’s install it then.
Open up the below link
According to what OS you want to download git in, click on that particular OS. You can go through the installation process given on that page.
Once you’re done with installing, type on cmd
git --version
To check if git is installed. Voila! Git is installed.
Step 2: Making a Git repository
Next we will see how to make a repository/file folder/directory.
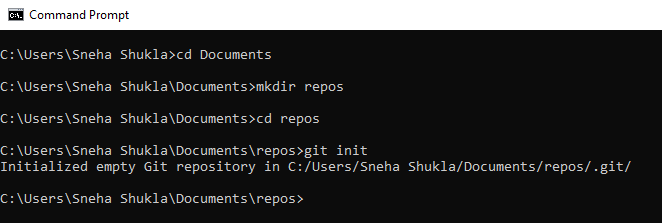
Type the following in cmd
cd Documents
CD means change directory. It means now I’m in Documents folder. I want to make a folder in Documents hence I’ve typed Documents. If you want to make a git folder in another location like Desktop, or another folder, type that in place of Documents. Make sure that the folder that you type already exists on your computer.
Now we’re in the Documents folder. If you don’t want to be in Documents directory and want to move back to the previous location, type
cd..
This will move us to the location we were before.
Let’s get back to Documents folder because I want to save my work there.
cd Documents
Tip: We can type cd Do and press tab key multiple times till we reach a folder that we want to work in that starts with Do. Or some other alphabet to see the other folders with that initial alphabet
Let’s create another folder repos in Documents where I actually want to save my work. For doing that type in cmd
mkdir repos
mkdir means make directory
Open up your file explorer and see if a folder is made in Documents named repos.

Let’s get into this folder via cmd
cd repos
This will initialize the repos folder as a git repository.Yahoo! This is the first step of actual git work.
You can do this via command line too
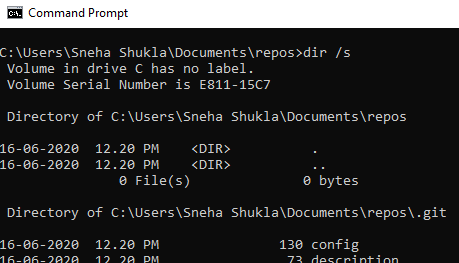
dir            \\ will show the directories present (for cmd)
dir /s         \\ will show all the hidden files too (for cmd)

ls             \\ will list out the files (for terminal)
ls -a          \\ will list out the hidden files (for terminal)
Step 3: Time to explore Git a bit!
A normal git command looks like
git [command] [--flags] [arguments]
Let me explain this
git fakecommand (-p | --patch) [<id>] [--] [<paths>...]

Optional values are surrounded in []

Placeholders are surrounded in <>

For grouping things we use ()

To disambiguate the commands we use --

Multiple occurrences are possible is shown by ...

To change the commands behaviors we use -f or --flags. Flags are basically options or switches given

| means or
Hey! Calm down if you didn’t get this. Once we start typing real commands nothing will stop you from learning this. Moreover if you want you can forget this as of now :D
Till then type this
git help        // where help is the command name and we have not      given any arguments or flags
git help -h     // for concise help
git             //similar to git help
And see what you see. It will list out all the basic commands that is used in Git along with their little description. We will try to learn most of these commands later. In case you ever forget a command, hopefully it will show or else we always have the internet :)
Step 4: Making GitHub profile
It’s time to go online! Let’s save up the things on cloud. Anytime your system crashes you can say “Phew! I saved up my work on GitHub. Nothing can destroy my code!” :D
Click on the above link and signup.
Step 5: Git configuration
We can configure user details using the command
git config [--local | --global | --system] <key> [<value>]
\\The --system flag applies to all files for all users on your pc.
\\The --global flag applies to all files that you use on your pc.
\\The --local or no flag applies only to local repository
git config <key> //gives the value of key
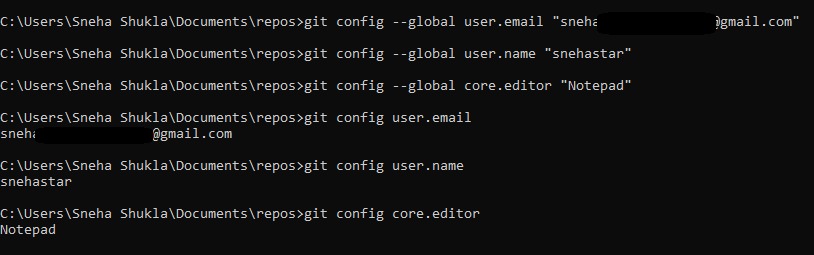
Open up terminal and type
git config --global user.name "your-user-name" //write the user name that you wrote for your GitHub account
git config user.name // this should show the username you gave
git config --global user.email "your-email-id" //write the email-id with which you made the GitHub account
git config user.email // this should show the email-ID you gave
git config --global core.editor "your-editor" //write your preferred editor like Notepad++, nano, vim
git config core.editor // this should show the editor you gave
Let me show mine as an example.
These configurations should be enough for us.
We will dive deep into Git in further articles. And learn the concepts of commits, merge, resolving merge issues, push, pull, fork, pull request, and many more.
Ending Note
Hey buddy! If you reached till here, pat yourself on the back and eat some chocolate🍫 and share it with me too as I haven’t had it for 3 months 🥺! What we did till now is just the warm-up before the big exercise that we’re heading to! I hope it was fun. See you in the next article! Thank you for reading!😊
Please click on the clap👏 as many times as you want to motivate me to write more such articles.
About the author

Sneha Shukla is a sophomore, pursuing BTech in Electronics and Telecommunication from IIIT Bhubaneswar. She is passionate about space,new technologies, IoT and writing technical blogs! Her hobbies include reading novels and articles, playing flute, badminton, travelling, exploring, photography,night sky watching, and zumba. To contact for any queries ping her on LinkedIn.
Reviews
If You find it interesting!! we would really like to hear from you.
Ping us at Instagram/@the.blur.code
If you want articles on Any topics dm us on insta.
Thanks for reading!!
Happy Coding